Manage Sub Accounts
Once you have signed up for a TeamBundle (hereinafter referred to as Primary Account), you can add people yourself (hereinafter referred to as Sub Accounts).
As an administrator of a Primary Account, you will see a new link option on your Membership page > Subscriptions tab. This link option, called ‘Sub Accounts’, looks like this:

When you click on that link, the Primary Account information for that subscription will be displayed as follows:

Primary Account for XX YY: The XX and YY shown here come from the registration form (First Name and Name) you used to sign up for this subscription. This will show the subaccounts who owns the Primary Account. You can also enter the name of your organization or company as the first name and surname. You can change these fields afterwards in your profile page.
X of X Sub Accounts Used: Here you can see how many of the assigned subaccounts have been used. For example: ‘2 out of 50 subaccounts used’.
Add Sub Account (button): Clicking this button will display a form with the following details:
- Existing Username: As an administrator, you can add the username of an existing user to your Primary Account by inserting that user’s name. The form field does not support entering the user’s email address. Also, no existing user will be moved if they are currently associated with a different Primary Account.
– OR –
- Username: (Required) Enter a new username for the new subaccount. Please note that usernames cannot be changed once submitted. It is therefore important that this is entered correctly.
- Email: (Required) Enter the email address that will be associated with the subaccount. The new member welcome email will be sent to this email address if the option below is enabled.
- First Name: Enter the user’s first name.
- Last Name: Enter the user’s last name.
- Send NEW members a welcome email: (Optional) Check the box next to this option to send a standard welcome email to the email address entered above. This email confirms that the user has been added to your Primary Account. Finish by clicking the “Submit” button.
Search Sub Accounts: Use this search bar to search for subaccounts in the table instead of manually searching each page. For best results, search by username or email address.
Subaccounts table: Here you can see all subaccounts linked to your Primary Account. The table shows the username, email address, first name, last name, last login date and the number of logins of the subaccount. As the administrator of the Primary Account, you can manually delete subaccounts by clicking on the ‘Remove’ link in the last column.
Previous/Next Page: Allows you to manually scroll through sub account user pages.
Export Subaccounts (button): Clicking this option just below the subaccounts table will export all subaccounts associated with your Primary Account.
Signup URL: This is a simple URL that you can copy and send to anyone who is allowed to subscribe under your Primary Account. Use the clipboard icon for quick copying. People who are allowed to subscribe under your Primary Account can then click on that link and enter their details themselves.
Import Sub Accounts via CSV: This allows you to import up to 200 subaccounts with a comma-separated CSV file.
You can optionally choose to enable or disable the following emails:
- Send NEW members a password reset link (does not send email to existing members): Sends the user a simple password reset link. As a holder of your Primary Account, you must use this option if you do not yet know the passwords for the subaccounts. This is because the welcome email should not contain password information.
- Send NEW members the welcome email if they have not already received it for membership: This is the same welcome email as mentioned above in the “Add Sub Account (button)” section.
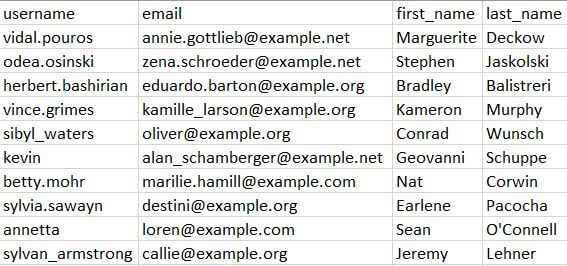
Formatting the CSV file with subaccounts. The only fields required for the CSV are:
- Username (“username”)
- Email (“email”)
- First name (“first_name”)
- Last name (“last_name”)
Here’s an example of an import file for subaccount members: